Student Visa How To Guides · May 6, 2026
Step-by-Step Student Visa Application Guide with AI-Powered Eligibility Checks
Learn how Torly.ai’s Instant Eligibility Checker and Document Organisation System simplify your student visa application from start to finish.
Introduction: Simplifying Your Student Visa with an AI eligibility checker
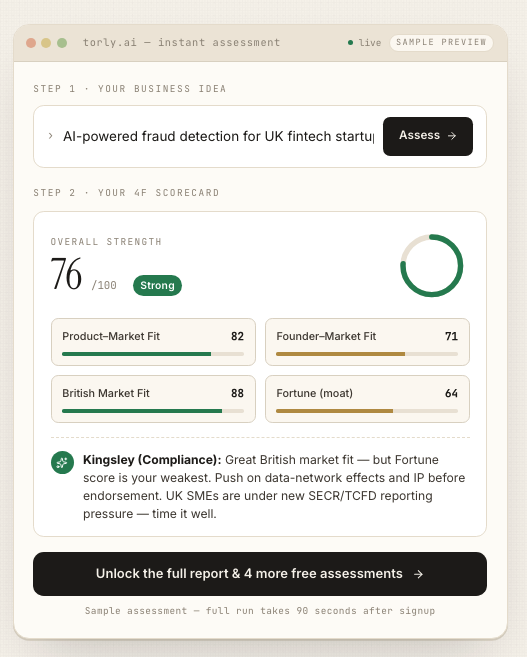
Navigating a student visa application can feel like solving a Rubik’s cube in the dark. You need the right documents, exact wording, precise timings and a checklist longer than your reading list. That’s why an AI eligibility checker can be a game-saver. It guides you through requirements, flags missing paperwork and even helps you sort financial proof without the guesswork. All in a few clicks, day or night.
In this guide, we’ll walk you through every step: from gathering your Confirmation of Acceptance for Studies (CAS) to booking your biometrics appointment. You’ll learn how Torly.ai’s Instant Eligibility Checker and Document Organisation System keep you on track, avoid last-minute panics and boost your chances of success. Ready to see how it works? Try the AI eligibility checker – your AI-Powered UK Innovator Visa Application Assistant and let the tech do the heavy lifting.
Why Use an AI eligibility checker for Your Student Visa
The traditional route means juggling PDFs, government portals and contradictory forums. You might miss a deadline, upload the wrong file or misinterpret a wording requirement. It’s stressful and time-consuming.
With an AI eligibility checker, you get:
- Real-time guidance on eligibility criteria.
- Instant feedback on missing or mismatched documents.
- Prompt alerts for upcoming deadlines.
- A centralised dashboard to organise everything digitally.
Imagine avoiding an entire week of back-and-forth emails with your university and consulate. That’s the kind of time and stress saving you get when you use Torly.ai’s system.
Step 1: Gather Your Key Documents
Before you type a single word into the application form, assemble these essentials:
- Valid passport or travel document (with at least six months validity).
- CAS statement from your UK institution.
- Proof of funds (bank statements, scholarship letters, or guarantor documents).
- English language test certificate (IELTS, TOEFL or equivalent).
- Passport-style photographs meeting UKVI requirements.
- Tuberculosis (TB) test certificate (if you’re from a listed country).
- ATAS clearance (for certain research degrees).
- Parental consent letter (for applicants under 18).
Tip: Scan everything in high resolution. The AI eligibility checker flags unreadable scans and suggests rescanning before you proceed.
Step 2: Use Torly.ai’s Instant Eligibility Checker
Open the Torly.ai dashboard and select “Student Visa”. Upload your scanned documents and basic details. Within seconds, you’ll see:
- A pass/fail status for each requirement.
- Recommendations for missing evidence.
- A checklist that updates as you tick off items.
This Instant Eligibility Checker learns from thousands of successful applications. It stays current with UKVI policy changes, so you don’t have to. You’ll see exactly what you need before you even log into the government portal.
Step 3: Complete the Online Application
Log in at the official visa portal (you must apply from outside the UK). Follow these steps:
- Create your account and enter personal information.
- Select “Student Route (formerly Tier 4)”.
- Input your CAS number and course dates.
- Upload your pre-checked documents.
- Pay the application fee and healthcare surcharge.
At this stage, the AI eligibility checker can validate your uploads one last time. It warns you if a file exceeds size limits or if the photo background isn’t plain enough. Check your status with our AI eligibility checker for precision and speed before clicking “Submit” to avoid unexpected rejections.
Step 4: Book Biometric Appointment and Proof Submission
Once you’ve submitted the form:
- You’ll receive a payment receipt and a link to book your biometrics.
- Choose a convenient Visa Application Centre location.
- Attend in person with your passport, a printed copy of the form and any additional documents requested.
The AI eligibility checker also reminds you of what to bring to your appointment. No more last-minute panics about missing appointment letters or outdated passports.
Step 5: Track Your Application and Prepare to Travel
After your biometrics, the Home Office usually takes a few weeks to process. Use the visa portal to monitor progress. When approved, you’ll receive a vignette in your passport valid for 30 days to enter the UK.
Before you book your flight:
- Check your university’s term start date.
- Plan UK entry within the vignette period.
- Prepare any pre-departure health or insurance checks.
Tips for Financial Proof
Showing you have enough funds is critical. Here’s how to strengthen your case:
- Provide three months of bank statements with a stable balance.
- If using a guarantor, include a letter of sponsorship and their bank evidence.
- Include scholarship award letters with fee coverage details.
- Make sure dates on all statements align with your application submission.
Using Torly.ai’s document organiser helps you tag each financial file, preventing you from missing any small detail that could delay your approval.
Understanding Work Rights on a Student Visa
Many students wonder if they can work while studying:
- Undergraduate and postgraduate students can work up to 20 hours per week during term.
- Full-time work is allowed in vacations.
- Certain internships and placements are endorsed by your institution.
Remember: breach of work conditions can lead to visa refusal. The AI eligibility checker flags over-work risks and reminds you of your limits.
How to Extend or Switch Visas
Should you need to extend your studies or switch routes:
- Apply no later than before your current visa expires.
- Gather updated finances and CAS for new courses.
- If switching to a Graduate Visa, ensure you’ve completed a qualifying degree.
Torly.ai can compare requirements for different routes and highlight the precise documents you’ll need for an extension or switch. That means fewer surprises in the application process.
Common Pitfalls and How to Avoid Them
Even small mistakes can cause big delays:
- Uploading the wrong file format (.jpg instead of .jpeg).
- Entering an incorrect CAS number digit.
- Missing the six-month passport validity rule.
- Forgetting to declare prior refusals or delays.
- Ignoring advice on ATAS or TB test requirements.
A simple slip can lead to refusal. The AI eligibility checker guards against these pitfalls by validating every detail before you hit “Submit”.
Testimonials
“I thought the student visa process would be a nightmare. Torly.ai’s Instant Eligibility Checker flagged a missing TB test certificate before I even realised it. I saved two weeks of back-and-forth.”
— Priya S., MSc Engineering student
“As an overworked undergrad, I needed something quick. The AI eligibility checker sorted my documents in minutes and kept me on track. No more late-night panics.”
— Luis M., BA Economics student
“I extended my visa without a hitch thanks to the Document Organisation System. It knows exactly what UKVI needs and when.”
— Amina K., PhD candidate
Conclusion: Ready to Streamline Your Application?
Applying for a student visa doesn’t have to be a headache. With Torly.ai’s Instant Eligibility Checker and smart document organising, you get real-time guidance, fewer mistakes and more confidence. Say goodbye to uncertainty and late fees.
When you’re serious about studying in the UK, let technology do the legwork. Get started with the AI eligibility checker to streamline your student visa journey